PM5 Product Notice

PM5 monitors on indoor rowers and SkiErgs manufactured prior to 4/14/2015 may be prone to a number of issues relating to loose batteries in the battery compartment. Potential issues include spontaneous resetting, flickering back light and error messages.

To address these issues, we have redesigned the battery door to better retain the batteries. As an interim solution, we added a foam pad in the battery door between 4/14/2015 and 7/14/2015.

To identify the age of your PM5, inspect the serial number on your indoor rower or SkiErg. The first group of numbers represents the date the unit was boxed. If these numbers indicate a date earlier that 4/14/2015, we recommend that you replace the battery door on your PM5, even if you have not experienced any issues.


Example of “REV A” marking
Additionally, any battery door marked “REV A” or “REV B” that does not have a foam pad should be replaced.

To request a free battery door replacement (part number 1096), please contact us directly.

In addition to replacing the battery door, we also suggest updating your PM5 to the latest version of firmware.

We apologize for any inconvenience you may have experienced related to this issue and hope that you contact us with any further concerns.

How To Use

Turning Your Performance Monitor On/Off:
The Performance Monitor turns on automatically when you do any of the following:
  • Pull the handle(s) on the indoor rower or SkiErg
  • Push a button on the PM
  • Connect the PM to a computer
  • Insert batteries
  • Insert a battery pack (applies to PM4s only)
  • Insert a LogCard into the PM (applies to PM3s and PM4s only)

The PM turns off automatically after a couple of minutes of inactivity. A spinning flywheel is considered activity, so the count starts once the flywheel stops.

Setting Date and Time:
 

When you first get your Performance Monitor (or if you work out at a gym), take the time to set the correct date and time on the monitor to ensure your results are associated with the proper date. It is not possible to edit the dates and times of past workouts, so it’s worth setting this information up correctly from the beginning.

  1. On the Main Menu, select More Options.
  2. Select Utilities.
  3. Select Date and Time.
  4. Set the correct date and time:
    • Choose plus or minus to increase/decrease the values as needed.
    • Choose the right and left arrows to navigate through the various digits.
  5. Select the checkmark icon to save the changes.
Setting Language:
  1. Access the Main Menu. If you don’t understand the language the monitor is currently displaying, press Menu until the display stops changing. This means you have reached the Main Menu.
  2. On the Main Menu, select More Options (the fifth gray button the right side of the monitor), then select Utilities (the fifth gray button again).
  3. Select Language (the second gray button on the right side of the monitor). You should now see the language selections.
  4. On the right side of the monitor, press the button corresponding to the language you want to select.
Changing Contrast: 
  1. On the Main Menu, select More Options.
  2. Select Utilities.
  3. Select LCD Contrast.
  4. Select Lighter or Darker, as desired.
  5. Press Menu or Menu | Back when you are satisfied with the contrast level.
Using the Monitor Display Options:
The Performance Monitor provides several display options. When you are rowing/skiing, press Display or Change Display to cycle through the displays described below. You can also use the buttons on the right of the PM to access these displays:
  • 1st button—All Data
  • 2nd button—Force Curve
  • 3rd button— PaceBoat/PaceSkier
  • 4th button—Bar Chart
  • 5th button—Large Print
All Data:
All Data provides the most comprehensive view of your workout. Depending on the type of workout you are doing (time, distance or interval), you can see the following information when looking at the All Data display:
  • Time/distance elapsed/remaining
  • Strokes per minute
  • Workout intensity, displayed stroke-by-stroke and expressed as either pace per 500 meters, Calories or watts 
  • Average workout intensity (in pace per 500 meters, Calories or watts) or total time/meters
  • Split time, meters, pace, Calories or watts 
  • Projected finish, as follows:
    • For time workouts, this shows the number of meters you’ll complete by the end of the workout
    • For distance workouts, this shows how much time it will take you to complete the workout; for Just Row/Ski workouts, projected finish is 30 minutes
    • For interval workouts, this shows your projected finish distance or time for the interval


Force Curve:
The Force Curve is an immediate graph of your power application during the stroke. When viewing the Force Curve display, the PM shows workout data on the top half of the screen and the force curve for each stroke on the bottom half.


PaceBoat/ PaceSkier: 

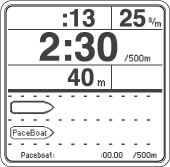
The PaceBoat/PaceSkier display allows you to row/ski against a target pace, illustrated by either a pace boat or a pace skier. When viewing the PaceBoat/PaceSkier display, the PM shows workout data on the top half of the screen and the pace boat or pace skier on the bottom half.

You can define a target pace when setting up a new workout, or you can use the ReRow/ReSki function to set the target pace to a pace from a workout done in the past. If you don’t set a target pace, the pace boat or pace skier matches your current workout pace.
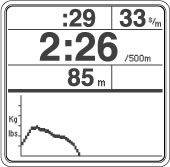
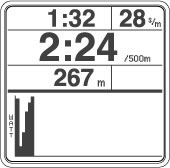

Bar Chart: 
The Bar Chart display shows your power output in watts by painting a bar chart/graph for each stroke you take. (If you are using heart rate equipment, the Bar Chart displays heart rate intensity instead and paints a new bar every 10 seconds.) The higher the bar, the more power you have generated in that stroke, or the faster your heart is beating in that 10 second period.

When viewing the Bar Chart display, the PM shows workout data on the top half of the screen and the bar chart for each stroke on the bottom half.
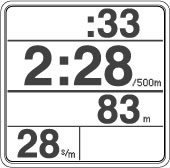

Large Print:
The Large Print display shows pertinent workout data in a large font for easier viewing.

Viewing Calories or Watts:
At any time during a workout or when viewing results, you can press Units or Change Units to change the units the monitor displays from pace to Calories or watts.

Viewing Drag Factor: 

Drag factor is a measure of fan load. The Performance Monitor self-calibrates by recalculating the drag factor on every pull, so you get a true measure of your effort regardless of the damper setting or changing conditions. You can adjust the drag factor by moving the damper lever on the flywheel. (Learn more about damper setting and drag factor)

To view drag factor on the PM:

  1. On the Main Menu, select More Options.
  2. Select Display Drag Factor.
  3. Begin rowing or skiing. The PM will display the drag factor after a few seconds.

A brand new indoor rower will have a drag factor of about 90–100 at a damper setting of 1 and about 210–220 at a damper setting of 10.

A brand new SkiErg will have a drag factor of about 55 at a damper setting of 1 and about 130 at a damper setting of 10.

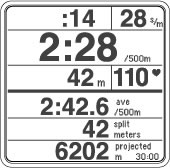
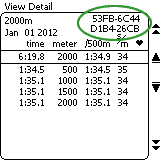
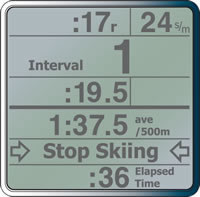
Understanding Splits:
The Performance Monitor displays workout results in two ways: as a final result for the total distance or time, and as a set of points (or segments) along the way called splits. The splits show how your pace varied through the workout.

In general, the performance monitors break a workout into fifths; so a split is 1/5 of a workout. There are a few exceptions to this. For example, splits for 2000m workouts are set at 500m, and splits for a marathon (42,195m) are set at 2000m. It is also possible to set your own split if you are setting up a new workout.

Splits apply to single distance or single time workouts. Interval workouts are not formatted to utilize splits.

Keeping Your Monitor Awake When Taking Breaks During a Long Piece:
The Performance Monitors are designed to power down after a couple of minutes of inactivity. To keep your monitor awake when you're taking a break during a long piece, periodically press Display or Change DisplayUnits or Change Units on the monitor face. This registers as activity for the monitor and will keep the monitor from shutting down.

Don't press Menu or Menu | Back as that will end your workout.

Saving Workouts to the Performance Monitor:
Just Row workouts longer than one minute or longer than 100 meters and preset workouts are saved to the PM automatically. After your last stroke of a Just Row workout, press Menu or Menu | Back twice and the meters rowed will be saved to memory. This can also be achieved by waiting 6 seconds after your last stroke and pressing Menu or Menu | Back once.

The PM5 stores over 1000 workouts in memory. 

Viewing Lifetime Meters (Odometer):
 

  1. On the Main Menu, select More Options.
  2. Select Utilities.
  3. Select Product ID.
  4. Select More information.

Lifetime Meters are displayed at the bottom of the screen.

While Lifetime Meters may be an indicator of the amount of use or wear on a particular machine, it may be misleading if the Lifetime Meters are reset or if the monitor has been replaced during the life of the machine.

Hard Factory Reset
Method 1
Hold down the Units and Display buttons and use a paperclip to depress and release the "Reset" button in the back of the monitor. Continue holding the buttons down for at least 7 seconds or until the display flashes "Setting Factory Defaults" shows briefly. Then, release the buttons.


Method 2
Remove the battery and USB cable if attached. Hold down the Units and Display buttons. Re-install the battery. Continue holding the buttons down for at least 7 seconds or until the display flashes "Setting Factory Defaults" shows briefly. Then, release the buttons.

Viewing Workouts in Memory:
PM5s either store workouts to Memory, or to a USB flash drive (PM5s) or a LogCard (PM3s/PM4s) if those devices are in use. Stored workout information is displayed as a final result for the total distance or time and as a set of points (or segments) along the way called "splits."

Take the following steps to view workouts in PM Memory.
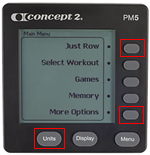
On a PM5

  1. On the Main Menu, select Memory.
  2. Choose how you want to see the workouts listed: List by Date or List by Type. If List by Type, then choose a specific type and select List Workouts.
  3. Use the up and down arrows to navigate to the workout you want to view, and select the magnifying glass icon (fourth button on the right).
Battery Information:
PM5s use two D cell batteries.
Checking the Battery Level
  1. On the Main Menu, select More Options.
  2. Select Utilities.
  3. Select Battery. The amount of power left will be displayed as a percentage.
Understanding and Changing Units:
The PM provides three different units for showing your workout intensity:
  • Pace per 500 meters—How long it takes you to row or ski 500 meters: the smaller the value, the faster your pace. The monitor displays your pace per 500 meters for each stroke as well as your average pace per 500 meters for the workout.
  • Watts—Your power output, in watts: the higher the value, the more power created. The monitor displays watts for each stroke as well as your average watts for the workout. 
  • Calories—The number of Calories burned: the higher the value, the more Calories burned. During a workout, the monitor displays the total Calories burned and also translates this to a Calorie/hour value (when viewing results, the monitor displays the Calorie/hour value). To calculate Calories, the monitor uses a formula based on a 175 pound individual. 

At any time during a workout or while viewing workout results, press Units or Change Units to view your workout intensity in a different unit; the PM cycles through the different units with each successive push of the button. In addition to pace, watts, and Calories, scrolling through units also displays total time or meters elapsed for the workout or interval, depending on the workout type.

Understanding Stroke Rate:
Stroke rate is the number of strokes you take per minute, or spm (Strokes Per Minute). The PM displays this number in the upper right corner on every workout display.

For rowing, a stroke rate between 24 and 30 strokes per minute is typical for most workouts. When racing, stroke rates are generally a bit higher but usually still below 36.

For skiing, the stroke rate will generally be between 30 and 40.

An important notion to understand is that an increased stroke rate does not necessarily mean that you are working out with more intensity. Instead, the key to increasing intensity is knowing how and when to apply power. Focus on getting as much power as you can into each drive/pull. To focus on this power:

  • For rowing, think of using a ratio of one beat on each drive for every two beats on the recovery. In other words, don’t rush as you travel up the slide to take the next stroke. Instead, relax on the recovery as you prepare for the work of the next drive. 
  • For skiing, the drive and recovery are generally much closer in length.

As you do this, watch the PM for immediate feedback on your intensity. As your intensity increases, your pace per 500 meters will decrease, and your watts and calories will increase.

Advanced Functions

The PM5 supports ANT+ and Bluetooth Smart for wireless heart rate monitoring. To use this feature, you will need a chest belt that supports one of these transmission technologies

Pairing a Chest Belt:
Before the Performance Monitor (PM) can detect your heart rate from a chest belt, you need to pair the ID of the chest belt with your PM. If you use a LogCard or USB flash drive with your PM, your chest belt ID can be saved to that device, so you should only have to perform this pairing once. If you do not use a LogCard or USB flash drive with your PM, you will need to repeat the pairing process every time you row or ski.

Before attempting to pair a chest belt with a PM5, please ensure you are using compatible equipment. 
Heart rate monitors use different technologies to transmit data. When purchasing heart rate equipment, make sure the equipment you purchase uses a transmission technology that your Performance Monitor supports. 

Pairing with a USB Flash Drive:
  1. Put the chest belt on, and press any button on the Performance Monitor (PM) to power it up.
  2. Insert your LogCard or USB flash drive into the monitor. If you are using a USB flash drive, wait for the PM to display the Welcome screen with your user name before moving to the next step.
  3. On the Main Menu, select More Options.
  4. Select Connect Heart Rate. Within 5–10 seconds, the PM will list identification information of any chest belt it finds. This information may include brand or model information and/or an ID number.
  5. Choose the ID that corresponds to your chest belt. (If you are unsure, check the chest belt ID, which is typically listed on the back of the belt.)
  6. Select Remember Belt. This saves your chest belt's ID to your LogCard/USB flash drive so that the PM automatically detects your chest belt in the future.
Viewing a Verification Code:
Verification codes are used primarily for Concept2 world and national records. They are not needed or required to participate in the Concept2 Online Logbook, Rankings, or challenges.

The PM5 monitor generate a verification code for each piece. This is a 16-digit code that is based on workout date, distance and duration. If you are entering a piece for the Online Rankings, you may want to edit your online logbook entry using the pencil icon and enter this code. Doing so will mark your piece as verified in the Ranking. Note: there is no need to enter a verification code if you are uploading your results using the Concept2 Utility or ErgData app, as these pieces are considered verified automatically.

To get the verification code for a piece:

  1. Ensure your PM is running the latest firmware.
  2. Ensure the date and time on your PM is accurate.
  3. Take care when setting up your workout, and complete your piece.
  4. After you have completed your piece, select (View Detail) for the piece.
    • If you are using a LogCard or USB flash drive, go to LogCard Menuor USB Logbook > List By Date and select the magnifying glass icon for the workout you want to view.
    • If you are not using a LogCard, go to Main Menu > More Options > Memory and select the magnifying glass icon for the workout you want to view.
  5. On the View Detail screen, the fourth gray button on the right has no action associated with it. Press this button twice. The 16-digit verification code will be displayed in the upper right hand corner of the monitor.

Using a USB Flash Drive: Overview
The PM5 works with USB flash drives (FAT and FAT32 USB formats only) to store your workout data and update your PM5 Firmware. Although using a USB flash drive is not required, it's a convenient way to store and manage workout data, and it allows you to perform firmware updates without needing to connect the PM5 to a computer. For best performance and reliability, use a name brand drive USB flash drive. Smaller USB flash drives will be more responsive, and we recommend not storing any other files on the disk. We also recommend not using USB 3.0 as they will drain battery life more without providing any speed benefits.


First Use: Initialize the USB Flash Drive
The first time you insert a USB flash drive into the back of the PM5, the PM5 creates a Concept2 folder on and adds pertinent subfolders and files to the USB flash drive. (Workouts, for instance, are stored in a Logbook subfolder of the Concept2 folder on the USB flash drive; firmware files are stored in the Firmware subfolder, and so on.) You will then be prompted to add a user name to the USB flash drive. This name identifies the owner of the USB flash drive (each USB flash drive stores information for a single user) and appears in the upper right corner of the PM5 screen. This process initializes the USB flash drive for everyday use with the PM5.
Note: You can also initialize a USB flash drive with the Concept2 Utility Version 7 or higher. 
Everyday Use/Logging Workout Data to the USB Flash Drive
  1. Insert the USB flash drive into the back of the PM5.
  2. Turn the PM5 on to the Main Menu and wait until the PM5 recognizes your USB flash drive. The PM5 must recognize your USB flash drive before you begin each workout. Please note:
    • Recognition will only occur while the Main Menu is showing.
    • Recognition may take five seconds or more.
    • Recognition has occurred when the PM5 displays the Welcome screen showing your user name in the upper right corner of the screen.
    • If the PM5 is off, press Menu to power it up and then wait for recognition.
  3. Your workout must be "ended" prior to removing the USB flash drive for the data to be saved in the USB Logbook. A defined workout will "end" upon completion. A "Just Row", interval, or uncompleted workout must be ended by pressing the Menu button. Workout data will be logged properly when the Main Menu screen appears. A "Just Row" workout less than one minute in length will not be logged.
Notes:
  • When the USB flash drive is in use, the fourth option on the PM5 Main Menu becomes "USB Logbook;" otherwise, this option is labeled "Memory," and any workout completed will be stored to the PM Memory instead of to the USB flash drive.
  • To see information and workouts that have been saved to the USB flash drive, select USB Logbook from the PM5 Main Menu, and select a menu option as appropriate.
  • While you can use the USB flash drive for storing other information, we do not recommend storing that data in or making any changes to the Concept2 folder or its contents.
  • Do not attempt to charge a mobile device using the USB flash drive port on the PM5 as this will overload the port. Attaching anything other than a USB flash drive to the PM5 is neither recommended nor supported.
  • The PM5 works with any quality USB Flash Drive that is formatted with FAT or FAT32. Please be aware, however, that some larger USB Flash Drives may be pre-formatted with incompatible file systems, so we recommend smaller size USB Flash Drives for use with the PM5.
Transferring a Workout From a PM5 Memory to a USB Flash Drive:
After you complete a workout, the PM5 saves it to the USB flash drive, if the USB flash drive is present; otherwise, the PM5 saves the workout to memory. The PM5 can store over 1000 workouts in memory.

To transfer a workout from memory to the USB flash drive:

  1. Insert an initialised USB flash drive in the PM5 and press Menu to power up the monitor.
  2. When the Welcome screen is displayed, select USB Logbook.
  3. Select Logbook Utilities.
  4. Select Move Workout.
  5. From the list displayed, select the workout you would like to move.
  6. Select Move to USB Log.
Games

The Fish Game:
The Fish Game teaches you how to modulate intensity. The object of this game is to rack up as many points as possible by eating the nutritious fish while avoiding the large, toothy beasts that will send your score plummeting to the ocean floor.

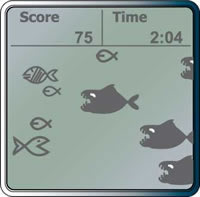
On the PM screen, you're the fish facing the onslaught of fellow ocean-dwellers, both good and not-so-good. Alter your intensity to move your fish up and down the left-hand side of the screen. When an edible “good” fish comes your way, try and gobble it up to get points (small fish are worth 30 points; striped fish are worth 60 points). Avoid the large predators, as they’ll take 45 points off your score if they catch you.

Each game lasts four minutes, with a play again option at the end. Your Fish Game workout information (time, distance, pace per 500 meters, and so on) is saved to your LogCard or PM Memory, just like a regular workout.
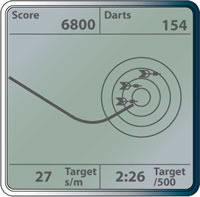
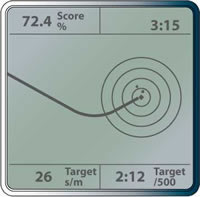
The Fish Game

Darts Game:
The Darts Game rewards consistency in tempo and power output. If you’re learning how to keep a steady pace and stroke rate, or if you’re working to get comfortable at a new pace, the Darts Game is a terrific tool for you.

Each game gives you 300 darts to "throw" at the target; the object is to earn as many points as possible. The number of points earned depends on where each dart hits:

  • Bull’s-eyes are worth 50 points each.
  • The next three rings out from the bull’s-eye are worth 25, 10, and 5 points respectively.

At the beginning of each game you will be asked to take five strokes. This sets your pace and stroke rate for the first few darts; after that, your target pace and stroke rate will be based on your most recent strokes. If you quicken your pace and stroke rate during the game, your dart will fly high of the target; if you slow your pace and stroke rate, your dart will fly low. Hit the bull’s-eye by maintaining a consistent pace and stroke rate. A perfect game is 15,000 points.
Darts

Target Training:
Target Training is similar to Darts in that the object of the game is to hit as many bull’s-eyes as possible by maintaining a consistent pace and tempo. Target Training differs by allowing you to set your targets for pace and tempo. Target Training offers two modes of play:

  • Just Play: An open-ended target training session that allows you to row or ski for as long as you want. Like the Darts game, the target pace will be based on your recent strokes.
  • Advanced: You set the constant target pace and tempo you want before the game starts.
    • Coaches: You can set the workout for your athletes and see who gets the best score.
    • Athletes: You can do your favorite steady state workout with the added incentive of achieving your best score!
    • If weight loss is your target, your routine should include long steady workouts—exactly the type that this game promotes.
    • If you are rehabbing from injury, you can use this game to help maintain the pace specified by your physical therapist.

Just Play: At the beginning of each game you will be asked to take five strokes. This sets your pace and stroke rate for the first few darts; after that, your target pace and stroke rate will be based on your most recent strokes. If you quicken your pace and stroke rate during the game, your dart will fly high of the target; if you slow your pace and stroke rate, your dart will fly low. Hit the bull’s-eye by maintaining a consistent pace and stroke rate.

Advanced: This is the same as Just Play except that you set the duration, pace per 500m and stroke rate before each game. Before scoring begins, you will be asked to pull five strokes. These allow you to get into the target pace and tempo specified during game setup.

In either mode of play, the number of points earned depends on where each dart hits the target:

  • Bull’s-eyes are worth 5 points each.
  • The next three rings out from the bull’s-eye are worth 3, 2, and 1 point, respectively.

Your score is given as a percentage of the best possible score obtainable. A perfect score is 100%.
Target Training

Biathlon:
Biathlon combines two sports: typically Nordic skiing and target shooting. Races generally consist of three or five laps, with a shooting stage (“range”) between each lap. A penalty is assessed for each missed shot. Most often, this is a penalty lap of 150 extra meters of skiing.

You can use the Biathlon Game to ski or row intervals alternating with target shooting or some other activity. You can choose from several penalty distances, or no penalty at all:

  • With penalty: Penalty distances are calculated after each range interval and must be completed before the next interval begins.
  • Without penalty: No penalty distances are calculated. You will simply have an undefined rest time of up to 10 minutes between your intervals.

The computer keeps track of your range time and your total elapsed time. Penalty laps show up on the logged workout detail as a separate interval with zero rest. You can Re-Ski or Re-Row the game workout, but penalty intervals and range time will be exactly as they were when you completed the workout originally.

During game set up, choose the number of intervals you want (from 2 to 15), the interval length, and whether you want a penalty (choose from none to 250m in 50m increments). Do your first interval. When you complete it, the rest or range time begins, and the PM will prompt you to stop skiing or rowing. Once you’ve stopped, the penalty screen will appear on the PM:

  • Playing with penalty: After completing your range time, press the button that corresponds to the number of penalties you incurred (from 0 to 5). For example, if you were shooting, choose the number of shots missed. The PM calculates the penalty distance based on what you selected during game set up (selected penalty increment multiplied by the number of penalties/shots missed equals the penalty lap distance). Do the penalty lap. When you are done, your next interval begins.
  • Playing without penalty: Simply press Continue when you are ready to begin your next interval.

Biathlon

Troubleshooting

Stuck on Zero:
Symptom
The Performance Monitor (PM) comes on and you can navigate the menus, but when you begin rowing or skiing, the monitor numbers stay at zero.

Resolution
  1. Ensure the “tach” (generator) cable is plugged in fully.
  2. On indoor rowers, ensure the model type on the monitor matches the indoor rower in use. Check this as follows:
    1. On the Main Menu, choose More Options.
    2. Choose Utilities.
    3. Choose Product ID and look at what appears next to "Model." This should be D or D/E for Model Ds, and D/E for Model Es and Dynamic Indoor Rowers (for reference, D/E will also be listed for SkiErgs, but this procedure applies to indoor rowers only). If you have retrofitted a monitor to an older indoor rower, this should read C, B or A according to the indoor rower you have. If this doesn't match the indoor rower model you have, take the following steps:
      1. From the Main Menu, select More Options > Utilities > LCD Contrast.
      2. Press Change Units or Units three times.
      3. Press Change Display or Display three times.
      4. When the Set Rower Type screen appears, press the button next to Change Type until the correct indoor model is displayed:
        • D or D/E for Model D Indoor Rowers
        • D/E for Model E and Dynamic Indoor Rowers
        • C, B or A as appropriate for the indoor rower you have, if you've retrofitted a monitor to an older machine
      5. Select Set Type to save the setting.

      Note: If you change the monitor batteries, you may need to follow this procedure again.
  3. If the problem persists:
    1. Unplug the monitor pickup wire and inspect it for frays or breaks. This is the wire that leads from the bottom of the monitor to the flywheel. If frays or breaks exist, the pickup wire will need to be replaced.
    2. Inspect the monitor pickup wire port on the bottom of the monitor. If there is a crack in the port, the monitor will need to be replaced.
    3. If the wire and port look fine, securely plug the wire back into the monitor.
  4. If the problem persists and you have access to a known working monitor, swap the monitors to determine whether the problem is with the monitor pickup wire or the monitor itself:
    1. If the known working monitor stays at zero when you begin your workout, the monitor pickup wire is faulty and must be replaced.
    2. If the known working monitor operates normally, the original monitor is faulty.
  5. If you do not have access to a known working monitor, contact Concept2 or your authorized dealer for further assistance. If the monitor is used in a health club or other setting where a user may have sprayed the machine down with a cleaning solution after use, inspect the inside of the monitor and the circuit board for contamination. To inspect the inside of the monitor:
    1. Disassemble the monitor.
    2. Inspect the circuit board. If contaminants are visible, wipe down the circuit board with a cloth slightly dampened with water.
    3. Allow the circuit board to dry and reassemble the PM.
    If the problem persists, or if no contaminants were visible on the circuit board, the PM must be replaced.
Battery Issues:
Symptoms
  • Your Performance Monitor (PM) is warning you that the batteries are too low, but you think the batteries are OK.
  • You’re using D cell batteries in your PM, and the battery life seems short.
Resolution 1
This resolution applies to PMs installed on the following equipment:
  • Model D Indoor Rower
  • Model E Indoor Rower
  • Dynamic Indoor Rower
  • SkiErg
Take the following steps to determine whether the problem is with the generator cable or the battery.
Note: This procedure will not work for the combination of a PM5, hardware version 500–599, and Firmware Version 20/720. For more information and alternatives update your monitor to Firmware Version 22/722 or higher.
  1. Remove all batteries from the PM.
  2. Ensure the “tach” (generator) cable is plugged in firmly and all the way.
  3. Row/ski hard on your machine.
    • If the PM comes on and stays on while you are rowing/skiing, then at least part of the generator is working. Proceed to step 4.
    • If the PM does not come on, then generator cable needs to be replaced, and you can stop following this diagnostic procedure.
  4. Install fresh D cell batteries in the PM. The PM should power up.
  5. Set the language and date (the year, at minimum).
  6. On the PM Main Menu select More Options, then Utilities, then Product ID.
  7. Look at the Model type. Make sure it is set to D or D/E.
  8. Press Menu or Menu | Back until you reach the Main Menu.
  9. Select Just Row/Ski.
  10. Start rowing/skiing:
    • If the numbers begin counting, then the generator appears to be working. Proceed to step 10.
    • If the numbers do not begin counting, stop this diagnostic procedure and replace the generator before proceeding.
  11. Stop, press Menu or Menu | Back while the flywheel is still spinning, and wait for 30–60 seconds. If you receive a low battery message, stop this diagnostic procedure and replace the generator.
Resolution 2
This resolution applies only to monitors in use with Model A, B, or C Indoor Rowers.
Under normal circumstances, a set of Alkaline D cell batteries should last in a PM3 or PM4 for about 350 hours of operational time, and about 200 hours of operational time in a PM5. If you find this is not the case, take the following steps:
  1. Check your firmware version: On the Main Menu select More Options > Utilities > Product ID. Running the latest version of the firmware may extend the life of batteries, as newer firmware uses the microprocessor more efficiently.
  2. Observe the performance monitor after rowing/skiing. The monitor should turn off within six minutes of the time you stop rowing (except when plugged into a computer, using PM4 racing, or during certain types of intervals). If it is not turning off within that timeframe, please contact Concept2 for assistance.
  3. Check the battery level: On the Main Menu select More Options > Utilities > Battery. Once the battery level gets down to about 80%, the battery percentage should not go down by more than 1% per day. If it does, there is probably damage to the circuit board and the unit should be replaced. In a health club, the most likely cause of this is spraying the monitor with cleaning chemicals.
Broken USB Cable Jack:
Symptom
The port (or jack) for the USB cable is loose. On the PM3 and PM4, this is the largest port on the bottom of the monitor. On a PM5, this port is on the back of the monitor and is located directly beneath the race system jacks. 
Resolution

The USB cable port has broken off the circuit board. To resolve the issue, the PM must be replaced.

Buttons Not Working:
Symptom 1
The monitor powers up and displays information, but one or more of the buttons on the monitor face (usually the Menu or Menu | Back button) do not work.

Resolution 1
This is a hardware issue, usually caused by corrosion on the circuit board. The PM must be replaced.
Symptom 2
Not all buttons on the monitor face power up the monitor. Only pressing certain buttons or rowing/skiing will power up the monitor. After the monitor is on, some buttons may not work unless pressing hard.
Resolution 2
The keypad may be aging or worn and cannot make the connection. 

Contact us if you are having problems with your monitor
 
Cannot Update Firmware with the USB Cable and Concept2 Utility:
If you have tried to update the firmware in your PM more than once and are encountering problems, follow the procedure below to reset the PM.
This topic applies to PM5s when updating firmware using the Concept2 Utility and a USB cable.
  1. Simultaneously press and hold the Change Units button, as well as the first and fifth gray buttons on the right (see image).
  2. While holding these buttons, reset the monitor using a paper clip and the reset button on the back of the monitor.
  3. Release the buttons when the PM displays "Concept2 Flash Loader.”
  4. If the issue is not resolved, close and restart the Concept2 Utility. If the issue persists, try rebooting your computer and attempting the update again.
If you have performed the reset and are still encountering problems with the update, please note the PM screen contents (error messages, etc.) and contact Concept2 for assistance.
Note for MacBook Users: If you have attempted the update multiple times without success, try another USB port. Some MacBook users have reported that this resolved the issue. If the problem persists, contact Concept2 for assistance.
Encountering Errors
If you encounter an error during the firmware update, recover the PM by taking the following steps and trying again:
  • Remove all other USB devices (printers, scanners, hubs, and so on) while updating your PM.
  • Try connecting your PM to a different USB port. Concept2 recommends plugging in directly to a USB port on your computer and not using a hub.
  • Try the update on another computer.
Missing Lines (Pixels) on Screen:
Symptom
The monitor comes on and works, but there are thin horizontal or vertical lines of missing pixels across the screen.
Resolution
The LCD is broken and must be replaced. You can replace just the LCD, or, if you prefer, you can replace the entire monitor.

Error Codes:
Error Codes 18- and 19-
We are working on a permanent solution to these issues. In the meantime, please try the task you were doing again. If the issue recurs and is consistently reproducible, please contact Concept2.
Error Codes 128-
Error code 128 means the PM5 is having trouble with external software. This happens most frequently with the third-party rowing software RowPro. If you are using RowPro, try shutting down all programs running on your computer and then reboot the computer. You can also try connecting with a different USB port on your computer. If the error persists while using RowPro, you will need to contact Digital Rowing for support at assist@digitalrowing.com. If you are using Concept2 software such as the Concept2 Utility, ErgData, or Venue Racing application, please contact Concept2 for assistance.
 
Error Codes 396 and 22291
This can happen if the mobile device goes out of range from the PM5, or if the mobile device is paired wirelessly to multiple devices such as Bluetooth speakers. The error codes can occur if the user is trying to run more than one fitness app to record the workout from the PM5 monitor. Make sure you choose only one app to record the workout and close any others that could be running in the background. ErgData is a good app to choose to record and upload your Concept2 workouts.
 
Error Code 575
This is most likely related to a battery door product notice you can read about on the PM5 product notice tab. If your monitor is within this time frame and has the REV A door, then you can order the replacement door using that link. It is also recommended that you update your PM to the latest firmware.
 
Error Code 779-1
Resolution 1: Replace Monitor
If this monitor is being used for racing, it is recommended that you replace the monitor.


Resolution 2: Separate Pins
If this monitor is being used for home use, you can separate the pins inside the RJ45 jacks or continue using the monitor even though the error persists.
 
Error Code 886
  1. Remove the batteries for at least one full minute.
  2. Reinsert two D cell batteries that have a good charge.
  3. Reset the time and date when prompted.
  4. From the Main Menu press More options then press Turn Wireless On.

If error code 886 recurs after taking these steps, then contact us for more assistance, and please provide the serial number of the PM5.

Error Codes 396 and 22291
This can happen if the mobile device goes out of range from the PM5, or if the mobile device is paired wirelessly to multiple devices such as Bluetooth speakers. The error codes can occur if the user is trying to run more than one fitness app to record the workout from the PM5 monitor. Make sure you choose only one app to record the workout and close any others that could be running in the background. ErgData is a good app to choose to record and upload your Concept2 workouts.

Racing

Wired Racing with a PC (Recommended applications):

  • Racing between nine or more indoor rowers
  • Formal race settings, such as the CRASH-Bs
  • Race settings where an audience display is required
  • Locations where more than one race/heat is happening at a time

Wired racing with a PC requires using software to manage the race. You will also need a way to wire the indoor rowers to each other and to the race system. You can do this with either USB cables or with network/Ethernet cables. The type of cables you select affects which software package you can use.

The two software packages available are:

  • Concept2’s Venue Race Application

Compatible with PM5s wired with either USB or network/Ethernet cables

The PM5s must be updated with firmware version 15 or higher. Version 3.5 or later of the Venue Race Application is required.

  • Digital Rowing’s RowPro

Compatible with PM5s wired with USB cables (Click here to the wiring diagrams on the How to use page)

RowPro enables venue racing with up to 16 boats per race in 3D. Boats can be single sculls, doubles, quads or octuples. RowPro also enables Online Rowing and Racing with one single scull per PC.

For more information about racing with RowPro, visit digitalrowing.com

Firmware

Firmware is the computer program that is embedded in and runs the Performance Monitor, and we recommend keeping your PM up to date with the most current firmware available for your monitor. Updating firmware requires a computer, our free Concept2 Utility and a USB cable.

Checking your Firmware Version:

  1. Power up the PM and access the Main Menu.
From the Main Menu, select More Options > Utilities > Product ID. The version number will be listed as "PM Firmware Version" at the top of the Product ID window.

Questions?

In order to assist us in reducing spam, please type the characters you see:

You may also like

No products found